Volunteering for Web Development
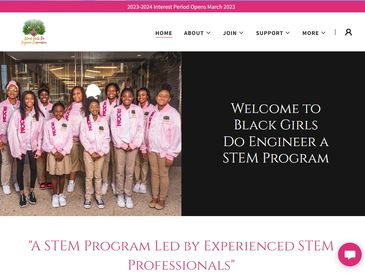
I had an opportunity to volunteer with an excellent non-profit that advocates to help Black-American girls pursue careers in the STEM fields

Hot Dog Grooming
For a college project, we went through the entire project process of designing and building a website for a dog grooming business.

Raspberry Pi Plex Server and Gaming Emulator
I set up a few Raspberry Pis for personal projects that turned out great.

Smart Housing the Home
Updating a home to a smart home can so many benefits such as convenience, increased security, and energy efficiency, and can be done with a little planning and research
Volunteer Web Development for Black Girls Do Engineer
Helping within the STEM field
Working within the STEM field has been absolutely great for me. Growing up in a disadvantaged and underprivileged environment made me consider very carefully which field I wanted to join. IT has given me so many opportunities for growth that I never saw for myself growing up. I jumped at the opportunity to work with an organization that sought to bring more diversity and talent to my profession.
The following is a brief overview of the work we did to update https://blackgirlsdoengineer.org/ make the site meet the requirements needed for the organization, broken down into ITIL’s Guiding Principles (we weren’t stringent in using this method, it’s just a great way to break down the effort).
Focus on Value
Black Girls Do Engineer's (BGDE) original website handled most of their needed requirements. I wanted to make sure we chose a product that would allow for the staff to update all items of the site with minimal effort, the user experience (UX) was easy and intuitive, and was reasonable in price and accessibility.
I first went through the requirements with the staff and then searched for products and services that would meet what they were looking for. After a few discussions with various vendors, we landed on using GoDaddy. GoDaddy was an excellent all-in-one option for the organization. It allows for web hosting, purchasing, and account management. Most of what was required was “out-of-the-box” from GoDaddy and needed little IT experience after go-live.
Start Where You Are
A majority of the site’s requirements where static and informational. This was an excellent starting point for the update. We could use almost all of the information from the original site and could be used for the update.
The staff were technical (reminder that they’re STEM professionals!) enough that any unforeseen issues after the launch could be handled from their previous experience with the current site, as well as vendor support from GoDaddy.
The organization already had most of the new requirements fleshed out through previous experience and feedback from the students and their guardians.
Progress Iteratively with Feedback
Over the course of the update, we worked together and made iterative updates to the site. We received buy-in from both training to use the site and from the end users. We made sure during the collaboration that we discussed any new information and updates as needed.
Think and work holistically
We kept in mind the overall intent of the site, which was to inform existing students/guardians of new information, as well as provide information for other users, such as potential students, volunteers, and donors. We wanted an intuitive and easy experience and made sure all individual parts of the website met the overall goal of the organization – to get students ready to go for STEM activities provided by BGDE.
Keep it simple and practical
With any IT project (or project for that matter), it’s very easy to get bogged down to the requirements and overcomplicated. With this project, the staff were very easy to flesh out the flow of the website and we were able to keep the overarching goal in mind. This site delivers easy to digest information, posted in a clear-cut way, that allows the viewer quick and easy access to exactly what they’re looking for.
Optimize and automate
One of the great aspects of this project was using GoDaddy for the original posting and any updates after my separation. They have all the tools and resources needed in the event that something can be improved in the future, and any new versions of the site (hopefully!) will be easy to integrate through.

Some updates may have occurred on the website since my involvement with Black Girls Do Engineer
Hot Dog Grooming

Grooming Application for a Small Business
This was a fun and interesting project I had the opportunity to work on during school. It gave me my first in so many parts of the project process. From this project, I got a fundamental understanding of the MVC pattern, I learned Ruby-On-Rails and finally felt comfortable with version control. Take a look (dev site)!

Full Functionality
The prowess to add pets, conditions, clients, etc. was an interesting challenge. Using fictitious data, we loaded the site and made it feel usable to the client.
Search, Reports, Updates
The site gave us the experience on how to work with Rails to show reporting features and searches.